Navigation

Showing posts with label tinkery. Show all posts

Monday, September 17, 2018

Who Needs a Dish Tool?


More home improvement projects have kept me out of the shop for most of the summer. However, I did finally have a chance to address the out-of-dish rear wheel on my Peugeot that I mentioned in a previous post. One thing I wanted to note about this task is that I dished the wheel without a specialized dish tool. In fact, when I hand-built the wheels for my Panasonic touring bike, I similarly did so without the use of a dish tool. That doesn't mean that I didn't properly dish the wheels - I did! I just didn't see the need to shell out money on a tool that I wasn't sure I'd ever use again.

After scoping out some of the online forums, I found a few commenters describing a method of measure wheel dish wherein the rim surface is set upon three raised surfaces of identical height, such as beer cans or pasta sauce jars. Then you stack quarters underneath the axle until they touch - or nearly touch - the end of the axle. Next, you simply flip the wheel over to check the dish. If the quarters are touching or nearly touching the other side of the axle, then the wheel is properly dished. If the quarters hit the axle or if there is a gap between the stack of quarters and the axle, then the wheel is out of alignment.

I went about conjuring my own homemade dish tool using two spare strips of 2x4 lumber. I set the 2x4s parallel to each other on my work bench and set the stack of quarters in between them. When I laid the wheel onto the 2x4s, it resulted in 4 points of contact with the rim surface that were all equal in height. The rear wheel on my Peugeot was badly out of dish due to some changes I had made to axle spacers, so it took a few trips back and forth between my homemade dish tool and the truing stand before I got it right. But overall it was pretty straightforward and I don't think it would've been much faster, easier, or better with a store-bought dish tool.

If you're looking to dish a wheel and would like to avoid purchasing a dish tool - especially if you don't plan on needing one often, AKA are not a professional wheelbuilder - feel free to use the method I've described here. It's pretty handy and can be executed with things you probably already have around the house or garage.

Thursday, May 24, 2018

Better Late Than Never: Critical Bike Maintenance


For the past few months I've had a couple ongoing - and probably unrelated - issues with the drivetrain on my 1980 Peugeot Course. The first issue was a clicking sound that was consistently happening at the same point through my pedal stroke. Visual inspection didn't reveal any observable problems with the crankset, so I figured the problem was with either the bottom bracket or one of the pedal spindles/bearings.

The second issue was more worrisome. Under very hard pedaling, such as when accelerating from a stop, the chain would occasionally 'slip.' This would usually happen when I was mashing down particularly hard and standing on the pedals, so to have the chain suddenly slip forward would sometimes cause my feet to lose traction with the pedals. I nearly ate shit several times trying to power through busy intersections. Not good. This problem appeared to originate from the rear derailleur, as the freewheel seemed to be in good shape and was relatively new. Replicating this problem on the repair stand was difficult, though, so I was never able to observe it very clearly.


Fixing the first issue was pretty straightforward. The problem could have only originated from the bottom bracket or pedal bearings, so I just replaced both. I didn't necessarily expect to replace my pedals, but when I went into my LBS for a new bottom bracket, I spotted a beautiful pair of gold MKS touring pedals. I had not been overly happy with my All-City track pedals for commuting and was feeling like something with a wider platform/cage and more grippy surface would be better on the Peugeot. So I took the opportunity to swap them out for something a little better suited to my needs.


The second issue was a little more tricky. I replaced the rear derailleur with a cheap used Suntour GT that I picked up on eBay, but the problem continued - and in fact got worse. So I found a newer derailleur that more closely matched the vintage of the bike, and also matched the front derailleur: a Suntour AR. For good measure, I swapped out the freewheel with another unit that I happened to have on hand. Unfortunately, it was a bit wider than my old freewheel, and the wider freewheel was rubbing against the frame of the bike. I moved some hub spacers around to get the freewheel away from the frame, but now my rim is out of dish. Not a big deal...I just haven't had the time and motivation to re-dish it. Probably something I'll get around to later this Spring.

I set out to fix a couple maintenance issues. In so doing, I ended up making some unexpectedly significant changes to the look and function of my bike. I'm pretty happy with the matching derailleur set - something this bike has never had, at least not since I took possession of it in early 2012. And the MKS touring pedals are pretty great...grippy and functional with a sleek, classic look. I'm probably a little behind on some other regularly scheduled maintenance - repacking hubs, in particular. But for now, the old Peugeot is running well enough.

Monday, May 21, 2018

Spring Cleaning in the Tinkery


For the past 6 months, I've been working on a series of home improvement projects around the house. Not only have they left me with little time to tinker on bikes (and write about it here), but they've also completely occupied the shop with lumber, woodworking tools, and a big ass mess that's made it impossible to use the garage for much of anything else. A couple weeks ago, I decided that needed to change.

I started by clearing everything out of the garage and giving it a decent cleaning. Then I added some additional shelving for the tools and gear that had been lying on the floor or stuffed into the lower shelf of my workbench. Tools and bike parts were sorted and organized. I also replaced the overhead lighting in the shop - a single screw-in bulb fixture - with a couple LED strip lights.

Now that the shop is cleaned up and organized, I'm ready to start working through a backlog of bike maintenance and repairs that I've been putting off for the past few months. That includes getting started on restoring the '83 Trek 850 that I picked up last fall.

Monday, October 9, 2017

A Little Piece of History In My Garage


It's been a long time since I've had a new project to work on. Maintaining the bikes we already have in our garage keeps me pretty busy, regardless of whether or not they're ridden often. But I've continued to keep my eye out for a good donor bike. I've been interested in maybe doing a heavy-duty resto-mod, turning an old road or mountain bike into a bomb-proof modern commuter. I just haven't been able to find the right platform for such an undertaking (I'll know it when I see it). Then earlier this week, I came across a local listing on Craigslist that I couldn't pass up: a 1983 Trek 850.

To look at it, the old Trek 850 isn't anything to write home about. The frame looks a lot like an old touring frame, complete with cantilever posts, curved fork with a steep rake, lugged frame, and high bottom bracket. The handlebars are a mile wide and it's got a really wonky V-shaped stem. The frame has a fair amount of surface rust, the whole thing is faded and dusty, and some of the componentry is non-original. The whole rig is pretty rough shape and has clearly been neglected for quite some time.

However, this particular model of bicycle is the first mountain bike produced by Trek. That's right...THE first Trek mountain bike. And once you understand the historical significance of this beat-up old specimen, it starts to look a lot more tantalizing. It begins to become less wonky (though it's still definitely wonky), and instead becomes a lot more special. It's a part of cycling history. And for mountain bike aficionados, the transition from home-built klunkers to mass-produced mountain machines like the Trek 850 was a really big deal. It's cool to get my hands on such an iconic bike.

So what comes next? One thing's for sure - there's no way I can bring myself to make major modifications to this bike. It's going to be restored back to its original glory...sort of. The machine is in rough enough condition that it'll never be quite as gleaming and blemish-free as it was in the summer of '83. Some of the patina is here to stay. But I'd say that's appropriate for a nearly 35-year-old bicycle. After all, this bike and I are the same age; and I've definitely got a few battle scars too.

It's going to be a really fun project. I can't wait to see how it turns out.


Monday, February 20, 2017

Spring Tune-up Came Early


The 1980 Peugeot Course received a much-needed facelift and tune-up over the weekend. The bike was covered in gray/black grime from being ridden in wet conditions. This was particularly bad - as it usually is - on the chain stays. There was also a thick coat of brake pad compound around the fork crown and the seat stays. While these may have been the worst spots, the whole frame was in an overall state of nasty and was badly in need of a thorough cleaning and polishing.


In regards to functionality, my shifting and braking had become mushy from the old neglected cables and housing. The bar tape that I put on the bike specifically for RAGBRAI 2015 was, at this point, pretty much disintegrating. And I recently decided to get rid of my Cardiff leather saddle after it had developed a pronounced ridge down its center line that was causing uncomfortable perineal pressure, so I swapped it out with the frighteningly ugly and rock-hard synthetic saddle that had come with Ginger's Motobecane Super Mirage. That too needed to be remedied.

I picked up an old, beat up Brooks B17 at a good price on eBay and snagged some RikeRibbon bar tape in a gaudy carbon gold color. What can I say? It beckoned to me. While at my LBS, I picked up cables and accessories. I also brought my intern/son along, and we had need to fortify ourselves after procuring our bounty. So that's what we did.


Once I had everything I needed, I got to work disassembling and cleaning the bike. I left the headset and cockpit where they were, as I find that the headset only needs to be overhauled rarely. And once you've got the cockpit set up just the way you want it, it's a huge pain in the ass to ruin everything by unnecessarily taking it all apart.


All the components were degreased as needed and cleaned up with a bit of soap and water. Once the frame was dry, I used a cleaning/polishing wax to give it a bit of luster and some protection from the elements and the general abuse of daily commuting. After I applied the wax, I had to wait for it to dry before buffing it off, and I enjoyed the down time with loud music, a delicious beverage, and thoughts of political resistance.


Reassembling the bike was mostly quick and painless. The components went back on the bike with ease and running cables and housing and getting everything dialed in on this machine is something I can practically do in my sleep. The old Brooks took a bit more work, as I noticed that the leather was very soft and pliable and sagging slightly, which caused the sides to splay. I thoroughly conditioned the old saddle to make sure the leather wasn't brittle, then drilled a couple holes along the bottom of each side and laced them together with a boot lace. The result is nearly perfect: a soft supple saddle that gives slightly under my weight without sagging.


The old Peugeot is definitely showing its age, but then again it hasn't exactly been coddled in the 5 years that I've had it. I ride it nearly every day and it continues to be a dependable, low maintenance machine for daily commuting, bar hopping, and around-town jaunts. Exactly what you'd want in a bicycle.

Monday, September 26, 2016

Built For The Long Haul: 1986 Panasonic Touring Deluxe


For nearly 5 months now, I've been working on building up a 1986 Panasonic Touring Deluxe frame. I could've pretty easily done it in half that time, if not less. But I had no budget for this project, so much of the delay in getting the bike built was due to continuously searching for steep discounts on components and parts. This project was also a bit of an oddity. It's a vintage bike and I wanted to stay true to its origins. But it's also a machine I wanted to reliably put thousands of miles on. For this reason, I struck a balance between new and old - seeking out used, vintage-era components when I felt that newer parts weren't needed, and bolting on brand new parts when I needed the advantage of a modern component.

So this was not a restoration project. Think of it more as a resto-mod. Whatever it is, this is my personal tourer and I can't wait to start cranking out some mileage on it.

The Frame: In a previous post, I discussed details of the frame, so I won't rehash those. Before I started buying parts for this build, though, I wanted the frame to be in top condition. I picked up some automotive touch-up paint from my local auto supply store and hit the more worrisome spots on the chainstays and fork with a couple coats. Once it had been touched up, I hosed down the inner surfaces of the tubing with Frame Saver. Then I used a polishing wax to clean it up and make the paint shine, followed by a coat of hard shell wax to protect the paint and minimize further oxidation in the areas where the paint was chipped or scratched.

The Drivetrain: The front and rear derailleurs are period-correct Shimano Light Action derailleurs (FD-Z204 and RD-L523, respectively). They're controlled by a set of clamp-mount Shimano L412 Light Action downtube shifters. A Shimano TZ20 6-speed freewheel, Hyperglide chain, and UN26 bottom bracket round out the Shimano-heavy drivetrain. The whole thing is pushed by a Takagi crankset. I don't know much about this crankset, as it came with the frame when I bought it. What I do know is that it's not original to the bike. However, it's in very good condition and a perfectly serviceable crank. I may someday replace it with something closer to original, but as for now it will do nicely.

The Brakes: As I discussed in a previous post, I had some issues finding suitable brakes for this build. Stopping power is provided by a beautiful set of Shimano 600 EX BL-6208 brake levers that I picked up on eBay and Shimano Altus CT91 cantilever brakes. While the CT91s don't quite have the vintage look of brakes like the Tektro CR720s or the Paul Neo-Retros, they're decent brakes that can be purchased for shockingly low prices, so I'm sufficiently satisfied with the end result.

The Wheels: This was one of my favorite parts of this project: building wheels. These particular wheels are a creation of my own design. I picked up a pair of vintage Shimano 105 HB-1050 front and rear 36-hole hubs that match the OLD on the old Panasonic frame for a great price from my LBS. I laced them to a set of brand-new Velocity Dyad 700c touring rims using DT Swiss Champion 2.0mm straight-gauge spokes. After all, it's a heavy duty bike that deserves heavy duty wheels. These fully custom, hand-built wheels are the ultimate in old-meets-new for the purpose of maintaining a vintage look - as well as compatibility - while maintaining maximum performance. Not so different from the rest of the machine!

The Accessories: In typical touring style, the saddle is a honey color Brooks B17 saddle, with matching honey color Brooks Microfiber bar tape. The tires are Schwalbe Marathons in a 700x32c size, and I'm currently using Shimano A530 pedals. I topped the whole thing off with a Racktime Add-It rear rack and a set of Jenson stainless bottle cages that give the bike a nice vintage - and slightly wonky - flair.


Wednesday, August 10, 2016

Modern Cantilever Brakes on a Vintage Touring Frame: A Cautionary Tale


In general, older brakes don't have quite the same stopping power and responsiveness of newer versions. The return springs tend become less sharp in pulling calipers or cantilevers back to their resting positions and the parts just don't seem to engage with one another quite like a brand new set of brakes. Plus, my Panasonic Touring Deluxe uses cantilever touring brakes, and finding original-era parts can be difficult and expensive (used versions of the Shimano AT-50 cantilevers that originally came on the bike can easily fetch $50-100 for a full set on eBay - comparable to many brand new cantilever brake sets).

Luckily, the resurgence of touring bicycles and the creation of multi-use styles such as cyclocross, hybrid, and gravel bikes have brought cantilevers and V-brakes back onto the market in a big way. So after reading numerous reviews, taking careful consideration of my limited budget, and accounting for the look and aesthetics that I'm targeting with the finished machine, I decided to go with Tektro CR720 cantilever brakes on the Panasonic touring bike. The CR720s have a fantastic, vintage-touring look and feel, are fairly well regarded by other touring cyclists, and are somewhat inexpensive. I found a great price for the brakes online and bought them.

Soon after receiving my Tektro CR720s, though, I discovered a problem. When I slid the brake arm and return spring over the post, I immediately noticed that the arm was extended so far outward that it was slumping downward. And the brake pad hit the braking surface of the rim at an angle, so no matter how much I fiddled with it in the slot of the brake arm, it was always contacting the rim along the edge of the pad where it would do almost nothing to slow or stop the bike. There just wasn't enough room for the brake to contact the rim appropriately. The rim and cantilever post were too close to each other.

I read through bicycling forums and quickly found that others had run into the same problem. Cantilever post spacing on older bikes is much more narrow than on modern frames and often won't accept newer canti brakes. So I was left with two choices: bite the bullet and pick up a set of vintage cantilever brakes at a premium price or keep buying different models of cantilever brakes until I found a set that worked through trial-and-error.

That's when I remembered that I had stashed away an extra pair of old Shimano Altus CT91 brakes that I had mounted onto my GT Outpost mountain bike. I dug out one of the brake arms and slid it over one of the Panasonic's front cantilever posts. After a bit of tinkering with the position and angle of the brake shoe, Voila! It fit perfectly! Even better, the CT91s are still widely available and can be purchased new very inexpensively (it's not uncommon to find them on sale for under $10 a pair). Admittedly, they don't have the same vintage look of the Tektros - in fact, I'd go so far as to call them ugly as hell. On the other hand, they've got fairly long brake arms that are pulled tangentially to the arm's direction of travel, giving them a decent braking force compared to the more widely-set touring and cyclocross brake arms of other models. And speaking from years of experience using them on my GT Outpost, they're pretty much indestructible.

They may not be pretty, but the Shimano CT91 brakes should work out well. In fact, they may be the only modern cantilever brakes that will work on my vintage touring frame.


Thursday, July 14, 2016

I Built Wheels!

A video posted by Cody Stringer (@stringdaddy) on

I decided to have some fun on the Panasonic Touring Deluxe project by building my own wheels. I considered buying a set of vintage wheels that would closely match the ones that originally came on the bike. After all, wheels with Araya rims aren't that hard to find, and are usually pretty inexpensive - even in excellent condition. But the original wheels would've come with Sansin touring hubs, which are much harder to find. So instead of buying used wheels that wouldn't have been original, I decided to do something a little different.

I picked up a set of new, unused 700C Velocity Dyad rims, with 36 holes and a V-shaped cross-section, from a guy locally for a fraction of what they would've cost retail. Then I bought a set of used Shimano 105 hubs - a rear hub from my LBS and a front hub from eBay. I laced them together with straight-gauge 2mm spokes.

The result is a beautiful set of old-meets-new touring wheels that are ready to ride. Because I used vintage hubs, I don't have to worry about cold setting the frame to fit a wider modern hub. But by using modern rims, I can have a more heavy duty, touring-ready wheelset that is also exceptionally lightweight.

There's only one snag that could render this whole effort useless: if the brake pads can't reach the braking surfaces on the 700C rim diameter. And unfortunately, the only way to find out for sure is to build the bike and see if it all harmonizes.


Thursday, June 23, 2016

Don't Make Me Go Out There


Here in southwest Missouri, we're now in the midst of an early summer heat wave. Day time temperatures have been in the mid-90s, with heat indices topping out at over 100 degrees throughout most of the last week. Even after the sun goes down, temperatures stay in the 80s until close to midnight and the humidity hovers at around 90%. While this isn't all that unusual for this time of year in the Midwest, it still sucks.

My garage - which also serves as my shop - is not air conditioned. It's also not very well insulated. So the garage is basically the same temperature as the outside temperature, except with a slight lag due to radiative heating from the brick exterior. This means that in the evenings, when I normally wrench in the shop, it's as hot as it was in the late afternoon but the humidity is skyrocketing. It's sticky and gross. I keep a box fan running, but it's still pretty miserable.

I have a hard time talking myself into working in the shop this time of year unless I have something really pressing to get to. I will find nearly any excuse to stay in the air conditioned house and not go out into the shop. My bicycle is my primary means of transportation, so it needs to stay in good working order. But any projects (like the Panasonic Touring Deluxe project I'm currently working on) end up taking a back seat until the weather cools off.

If it sounds like I'm trying to talk myself into getting an air conditioner for the shop, that may be true. But I don't think it's going to happen any time soon.

Wednesday, May 11, 2016

Panasonic Touring Deluxe: A Blank Slate

I've never really built a bike up from a frame before. Sure, I generally strip each of my project bikes down to the frame when I start a rebuild. But I normally try to reuse as many of the original parts as possible, so I work within those boundaries and thus don't take too many liberties with the aesthetics of the bicycle beyond a saddle upgrade and grip or bar tape color. In the case of my Panasonic Touring Deluxe project, though, I'm starting with only a frame and a fork. It's basically a blank slate, and I'm free to be creative with how I build it up.

With that said, I plan to piece the machine together with a mix of original components - specifically for the drivetrain - and new or non-original parts. I've already picked up the Shimano Light Action groupset that came stock on the 1986 Touring Deluxe, and I plan to hunt down the matching Light Action downtube shifters. While I'm not as concerned about the make and model of the cockpit parts, I would like to retain the original look of the bike with a simple gooseneck quill stem and randonneur bars. Probably the coolest parts of the original bike were the Shimano drillum brake levers, so I'd like to find a set for this project.

I've been agonizing over what to do about wheels. Initially, I wanted to use this project as an opportunity to build my first set of wheels. But I also like the idea of fixing up an old wheelset that is from the approximate vintage of the bike. I think I've found a compromise - lacing new touring rims to a set of used vintage hubs. And in the hopes that I can pull it off, I picked up a brand new set of 700C Velocity Dyad 36-hole touring rims over the weekend. Eventually, I'm planning to pick up a pair of serviceable used hubs from my LBS to lace them to.

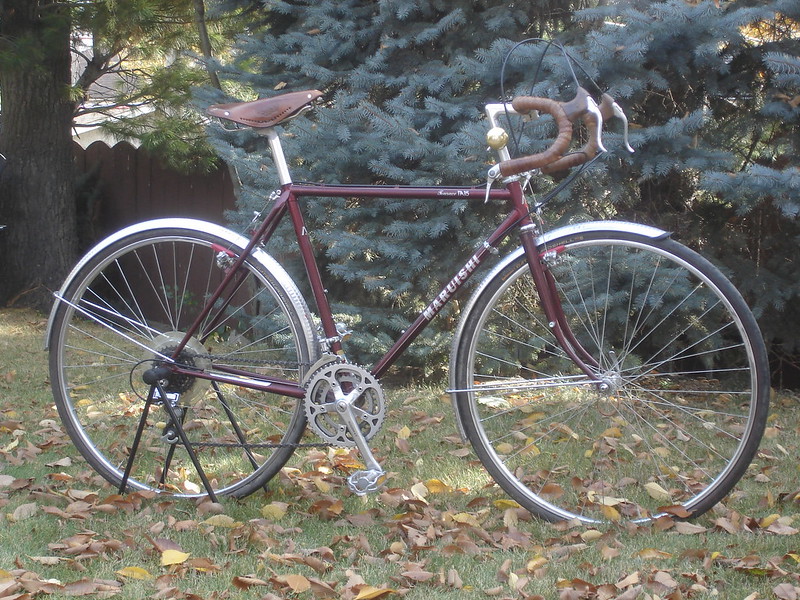
Regarding aesthetics, I plan to go with unpainted aluminum with most - if not all - of the components on the Touring Deluxe. With the dark red of the frame and the white lettering of the decals, nearly any color scheme will look great on the bike. Certainly a black saddle and black bars would look nice, similar to this Miyata 615. But I also really like the way this Maruishi looks with the dark aged Brooks leather of the saddle and the bar wrap. Then I ran across this handsome specimen - an identical year and model as mine. I don't much care for the green cloth-looking wrap on the bars, but the lighter color brown saddle looks very attractive. With this in mind, I'm thinking I'll go with an even lighter shade for the leather that will really pop against the dark red of the frame; perhaps a honey color Brooks. Not sure about bar tape, as I'd like to see the rest of the bike built up before I make that decision.

This is going to be a fun project, but I'm planning to take my time and do it right. Look for good deals on parts to keep my project costs low, while also paying particular attention to the quality of the components that I add to the bike and level of craftsmanship that I devote to it. After all, I plan to put some serious mileage on this bike and I want it to require as little maintenance - especially field maintenance - as possible.


Monday, May 9, 2016

New Project: 1986 Panasonic Touring Deluxe


Since RAGBRAI last summer, I've been on the lookout for a touring rig. What can I say? Spending days out on the road appealed to me, and I'm hoping to do more of it. While my Peugeot PH-10 could probably do the job as a light tourer, it's not really meant for that kind of duty. Indeed, the frame geometry is pretty compact, it doesn't have front-side eyelets on the fork for a front rack, and it only has one set of mounts for a bottle cage. Plus, I've built up the bike as a commuter, so to tackle longer rides, I've started swapping out pedals and using cleats, which reduces my leg extension. Then I have to slightly raise my saddle when I use my clipless pedals. It just ends up being a pain, so I decided the best (and most fun) course of action would be to build up a proper touring bike.

I picked up this Panasonic Touring Deluxe frame on eBay for a decent price. It came with the original fork and headset and a non-original Takagi triple crankset. The frame is constructed of double-butted Tange 1000 chromoly and the fork is Tange Mangaloy 2001. They're perhaps a bit on the heavy side, but are certainly fine materials. The frame and fork are in beautiful condition, with only light signs of wear, aside from some denting and scuffed paint on the chainstays where a previous owner had bolted on and over-tightened a kickstand clamp. Shouldn't be a problem to buff out any rust spots and touch up the paint, though. According to the 1986 Panasonic catalog, the frame color is Canyon Red, and it's a really good-looking deep maroon. But what I really love about the frame are the decals, which are a sparkling white that really pop in the sunlight.


The machine has double eyelets both front and rear for fenders and racks. It also has two sets of bottle cage mounts. The relaxed geometry with long wheelbase is ideal for touring, so it really is a true touring bike. Probably not the best for heavy touring duty, but it should handle light to medium loads without too much trouble. The old Panasonics are well-regarded and are, by all accounts, solid hand-built rigs that have become sought after in some circles. I'm looking forward to getting started on rebuilding this bike, and then spending many years riding it.


Monday, April 25, 2016

The GT Outpost Gets (Another) New Life


It took some work to get the old GT Outpost into decent condition after being neglected for so long. Once the bike was undressed down to the frame, the components and frame were cleaned thoroughly with soap and water. After that, I attacked any spots of rust with the polishing wheel. The front derailleur and the original crankset were too far gone, so they ended up in the trash. And I figured this was the time to go ahead and replace the old, beat up rear derailleur as well. KC was kind enough to give me a spare Shimano STX RC rear derailleur and a Shimano XTR crankset, and I picked up a Shimano STX front derailleur from Queen City Cycles. Once everything was cleaned up, I bolted the components back onto the bike. Then I slapped a new chain on the drivetrain, ran new cables and housing, and dialed everything in.

I've developed a new-found respect for this bike as I worked on it over the past couple weeks. The triple triangle frame made with 4130 chromoly is pretty much bulletproof. It also has double eyelets both front and rear, so it's ready to handle loaded all-terrain touring. Many miles on the Katy Trail have shown that it rides beautifully on longer trips. And my best attempts at attacking single track have shown that it's highly versatile. While I don't ride it as often as I should, I hope to keep this machine around for many more years.